First of all, I am by no means an expert in photography nor processing photos, this is just a way I have found effective for myself! Much credit goes to Mike Hollingshead, for his unselfish help he has given me ! Here are his tutorials on post-processing.
So I'm going to assume you have a DSLR, and have shot a photo in RAW, and now we will process it using Dick's lazy method.
Here is an image I took on May 22nd, 2007 shortly before the tornado. I was using a Canon Rebel XT with my most recommended lens...the Sigma 10-20. I like this lens because at 10 mm, it allows you to get closer, (if that's your thing) and get the whole picture, along with structure.
Here is the photo totally unprocessed, and shot as is in RAW. The only thing I have done to it, is resize it so that it is viewable on the web.

I'll assume you have some sort of Photoshop, as I have CS2, and use that.
But before that, I will show how to process a RAW. If you have Canon's software, I use that and simply open up ZOOMBROWSER, right click the photo I want, and hit "Process RAW image."
So this is the screen that should pull up. This is a very basic RAW processor, but it's so easy, and won't allow you more time to screw with a photo, and you can get pretty good results.

First things first with me, I want to mess with the contrast. With images that are dark, you will generally want to start going down the ladder from Standard- to low. I always check each of Canon's 5 different levels out, to see which I like best. This one seems kind of like there is too much light in, and not enough detail darkened detail (as I remember the sky), so I'll hit "high" for contrast, and this is what it has done.
*Note, I resized these to 800 x 533, and sharpness will be lost with any resized picture, but not to worry as it is fixable*

Notice how a lot of the gray's are now replaced by blacks, and it gives the image more detail. For an image with a dark foreground, you might consider "low" contrast, as that will lighten it up a bit. Open the first picture's link up and the second one in new tabs, and you will be able to see the difference.
Next, would be the exposure compensation, this is good for a blown out sky (Whited out) or if the shot is under-exposed (too dark). I like the way this image looks, exposure-wise, so I'll leave it. I wouldn't recommend doing more than .3 up or .3 down, as it can create a lot of "noise."
This is pretty much all I do in the RAW processor, sometimes adjusting the saturation to HIGH, and that's about it. I ALWAYS leave on Auto White Balance, because this is the way I shot it, and it looks comparable with what I am seeing.
I leave the sharpness settings, because I will show you how to make them sharp in Photoshop. Contrast and Save button pictured below.....

So save the image as whatever you want at the highest quality you want to keep it in. I use JPEG, unless I am wanting a major print, then I will save in TIFF 8 bit. So save to JPEG as highest quality with 2000 pixels per inch. (I save highest quality, feel free to save how you wish). Example box below...

Now open up photoshop, then the photo you just saved. The first thing that should be done is levels. This is what sort of, eliminates the grays, and the lightness of the colors, and makes them stand out a little better. This is huge in processing and is simple. So go to the top and open "Image" then click on "Adjustments" then "Levels", and this is what it should look like with the histogram popping up. Note where the box is (top left of the screen capture), if you can not find it.

I wish I shot every shot as good as this, as it is nearly perfectly exposed. lol. Notice how on the histogram here it curves upward towards the middle then back down again almost to the edge, but not quite.
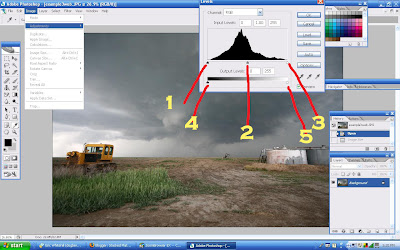
Use Slider 1 (Far left top slider) and barely move it to the right until it gets to the black where the black starts to go upwards. Now do the same thing with Slider 3 (Far right top slider), moving it to the left where it meets the black as it starts to angle upwards. Here is a pic, and what it should look like.
You'll notice on that levels box there is a "Preview" button, always make sure that is ON. But to see the before and after pictures, clicking it on and off is essential, to always see what you've done, and not just on the Levels box!!!!
So here is the progress so far with the levels.......

Notice where the sliders were, and now are, and check and uncheck your preview box to see the improvements! Much better!
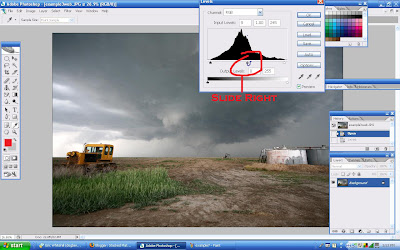
Now for the middle slider, the midtones (Slider 2).
This one can go a number of ways, and can be done whatever way you want to do with the image, so slide it to the right. Note the Preview box is checked, to see our progress at all times. Unchecking it shows our original image before the levels. The blue dot is where our original midtone slider was prior to moving it (slider 2).
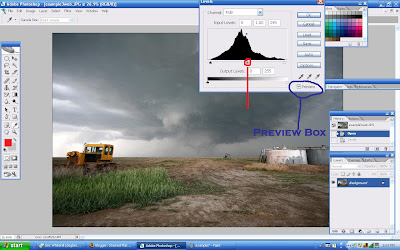
I move the slider to the right as shown here........just a tad, (do it as you wish either way) to make the image darker, and for the clouds to come out a little more detailed.
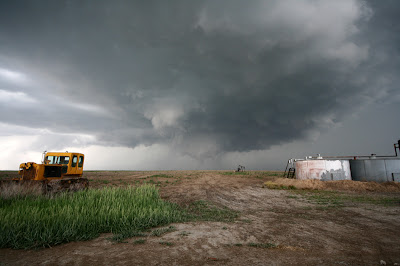
So this is what our image looks like so far. Scroll up to the very first unprocessed image, open two new tabs, one for this and one for the old, and see what a difference it makes! *Image resized again, to 800 x 533 for viewing on the web*
I won't get into shadows/highlights in this one, I'll do it in a future one, but this photo doesn't need anything, so we'll move onto sharpening! So go to "Filter" at the top, then "Sharpen" then click on "Unsharp mask" as shown below. You should see a box come up with "Amount" , "Radius" and "Threshold."

Now I will almost always have Radius on 1.3 and Threshold 1-3. So set yours to that.
Now the amount is tricky and different photos will require more. So I would think this particular photo is worthy of 106%. But the range for me is anywhere from 50-300! Again, use that preview box to see how much you have sharpened your photo! Great details have now come out, and your image no longer looks "soft."
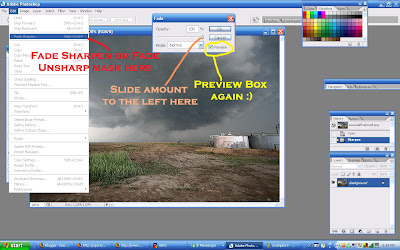
Now I will at times overdo it a little, and use the "fade unsharp mask function." This can be found on your "Edit" then you'll see the option. Again, use your preview box for your liking, clicking on and off! Image below......
Save your image as ___whatever but make sure you don't save the resized one (below) the same as it.
So now we resize our photo, by clicking at the top "Image" then image size. I save to 800 x 533 almost always, and 72 DPI will work, but I used 2000 in this one.
Oh no, our image doesn't look as sharp! It almost always softens it when resizing it, but not to worry, we can fix it a little. Notice how the image "softens" up, and the image does not look as sharp now.
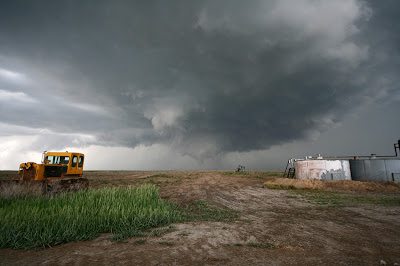
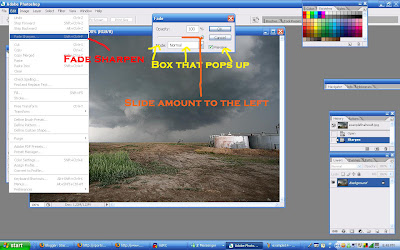
Go back to Filter> Sharpen> and this time select "Sharpen." Your image will most likely look wayyyyyyyy too sharpened, but again, we'll fade it. By clicking Edit at the top, then Fade Sharpen. I'm going with 50% on this one, clicking my preview box on and off again :-D. Image below.....
So here is our before picture.....with nothing done as a RAW image....

And this is our final product!
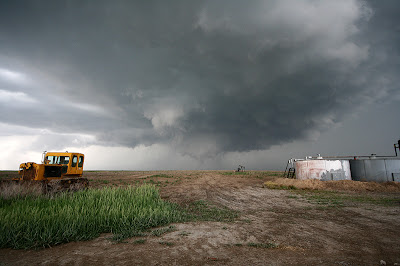
Notice how the grass, especially, looks very sharp (I love that in a photo), and how we've not changed the colors, but enhanced them, bringing out better detail. So by looking at the first photo, and the last photo, you can see this is not "photoshopping" an image, it is processing. Do you think that first image is what I saw, all dull looking? No! It's as if we forgot our glasses, and couldn't see clearly. That's essentially what we did, was put on our glasses :) (I know, lame).
Save this one as "web" or whatever you choose, but for your print one, keep them with obvious different names. Pretty easy eh? No? It will be once you get this down. It will take you longer to read this, than to actually do it, once you get it down!
More detailed processing techniques coming soon.
Please leave a comment below if you need any help, or if things aren't clear!


